Epson Adjustment Program: Epson Ink Pad Resetter Tool
Master the Epson Adjustment Program! Reset counters, clean print heads, fix errors, and optimize your printer with our step-by-step guide and expert tips.
Praveen Kumar - Canon Printer Specialist
12/23/20249 min read
Have you ever encountered a sudden "Epson ink pad at the end of its service life error" message on your Epson printer right when you needed it most, or struggled with declining print quality despite your best efforts? These situations can be both frustrating and costly, with downtime and service fees quickly adding up. Fortunately, many of these issues are caused by counters and settings that can be easily reset using the Epson Adjustment Program. This powerful tool is designed to resolve common errors, reset counters, and perform essential maintenance tasks, helping you restore your printer’s performance. In this guide, we’ll show you how to install and use the program effectively, so your printer remains in top shape and ready when you need it.
1. What is the Epson Adjustment Program?
The Epson Adjustment Program, commonly referred to as the reset utility, is a specialized software tool created for Epson printers. It allows users to carry out advanced maintenance and troubleshooting tasks that go beyond what standard driver utilities offer.
Key Benefits of the Adjustment Program Epson Ecotank
Error Resolution: Fix common printer errors like "Service Required" or "EPSON ink pad is at the end of its service life error."
Waste Ink Counter Reset: Reset the internal waste ink counter without replacing the printer’s waste pads immediately.
Advanced Diagnostics: Perform tasks like head alignment, EEPROM resets, and firmware updates.
Enhanced Printer Longevity: Regular maintenance with this tool can extend the life of your printer.
Supported Models
The tool is compatible with many Epson models, including:
Home Printers: EcoTank series (e.g., L3150, L3110)
Office Models: Workforce series (e.g., WF-2850, WF-3820)
Photo Printers: SureColor series Make sure to download the version specific to your printer for compatibility.
The Epson Adjustment Program is an invaluable tool for anyone who relies on their Epson printer for work, school, or creative projects. It can resolve complex issues.
2. Installation Guide
Getting started with the Epson Adjustment Program is simple if you follow these steps carefully.
System Requirements
Before installing, ensure your system meets these basic requirements:
Operating System: Windows (XP, 7, 8, 10, or 11)
Processor: Minimum 1 GHz
RAM: At least 2 GB
Connectivity: USB connection to the printer
Downloading the Program
Since the tool isn’t officially distributed by Epson, you’ll need to download it from a trusted source:
Look for reputable websites or forums that offer the Epson Adjustment Program.
Verify that the version matches your printer model.
Download the software and scan it with an antivirus tool before installation.
Installing the Program
Extract Files: After downloading, extract the compressed file to a folder on your computer.
Run Setup: Open the folder and double-click on the setup or executable file.
Follow Prompts: Complete the installation by following on-screen instructions.
Allow Permissions: If prompted by your antivirus or firewall, allow the program to run.
Launch: Once installed, open the software to ensure it functions properly.
Common Installation Issues and Fixes
Software Not Launching: Ensure you’ve installed the correct version and disable antivirus temporarily during installation.
Printer Not Detected: Check the USB connection and verify drivers are installed.
With the tool installed, you’re now ready to explore its powerful features.
3. Getting Started
Once the Epson Adjustment Program is installed, it’s time to connect your printer and dive into the functionality.
Connecting Your Printer
USB Cable: Ensure your printer is connected to the computer via a USB cable. Wireless connections are not supported for this tool.
Power On: Turn on your printer and ensure it’s in a ready state (no blinking error lights).
Drivers Installed: Verify that your printer drivers are installed correctly on your computer. You can find the latest drivers on Epson's official website.
Launching the Epson Resetter Program
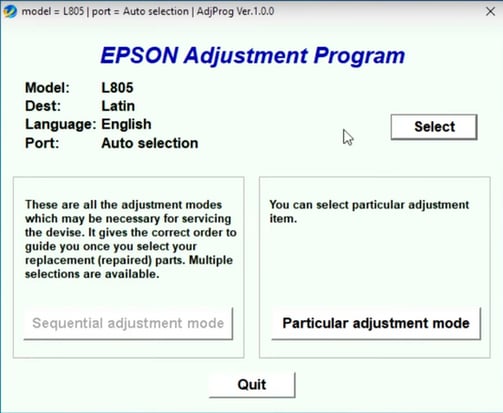
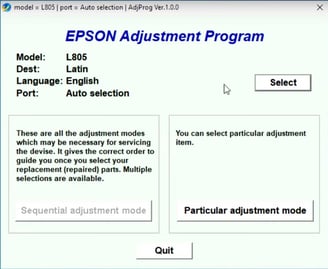
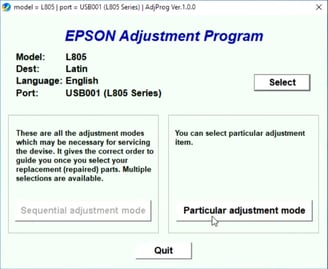
Open the Epson Adjustment Program from your desktop or start the menu.
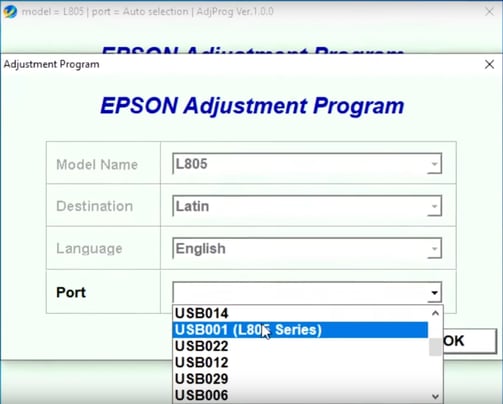
Select your printer model and the appropriate port from the dropdown menu. If unsure, select “Auto Detect.”
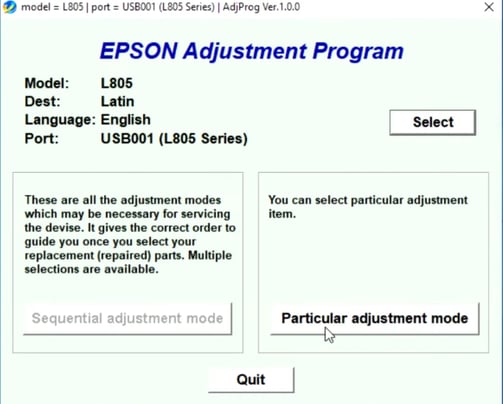
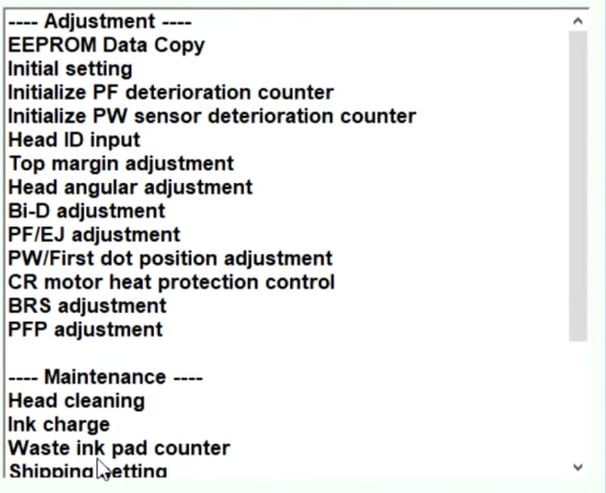
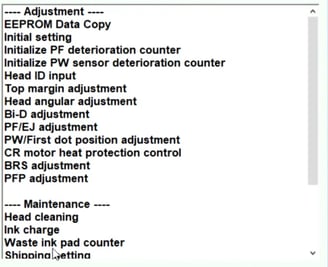
Program Interface Overview
The interface typically includes:
Model and Port Selection: To specify the connected printer.
Maintenance Options: For tasks like resetting counters or performing head alignment.
Reports and Diagnostics: For detailed status checks.
Tips for First-Time Users
Take your time exploring the interface before performing any actions.
Refer to your printer manual for any specific model-related instructions.
With the printer connected and the software ready, you can now proceed to utilize its features to maintain and optimize your printer.


4. How to Use the Adjustment Program Epson
The Epson Adjustment Program is powerful, but it’s essential to use it carefully to avoid unintended issues. This section provides a detailed step-by-step guide on how to perform common tasks using the tool.
Preparation Steps Before Use
Before using the program, follow these preparation steps:
Check Printer Connectivity:
Ensure your printer is powered on and connected via USB to the computer.
Avoid using wireless or network connections, as the program requires a direct USB link.
Install Required Drivers:
Download and install the latest drivers for your printer model from Epson's official website.
Verify the printer is recognized in your system's device manager.
Disable Antivirus Temporarily:
Some antivirus software may flag the adjustment tool as a threat.
Turn off the antivirus temporarily while using the program, and enable it afterward.
Run the Program as Administrator:
Right-click on the program icon and select “Run as Administrator” to ensure full access to system resources.
Step-by-Step Guide for Common Functions
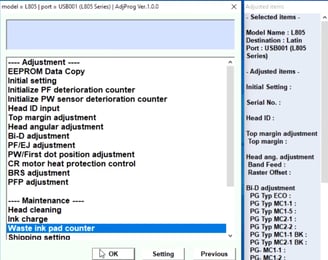
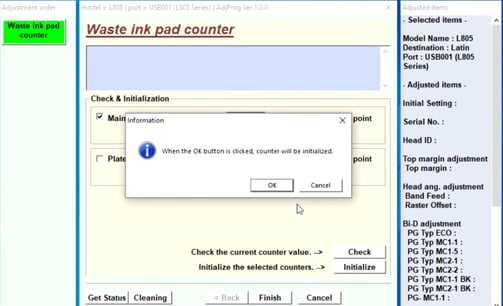
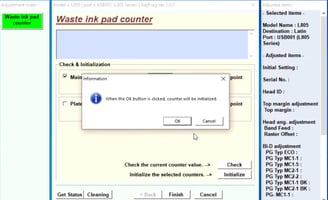
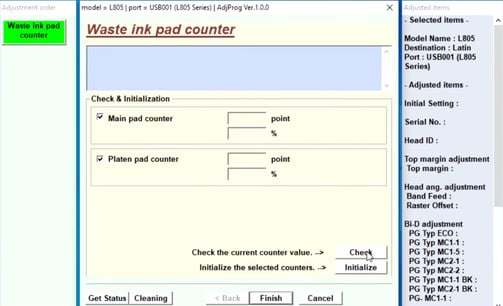
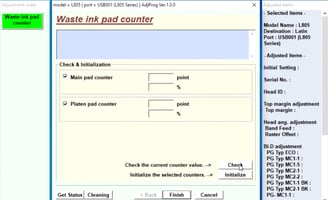
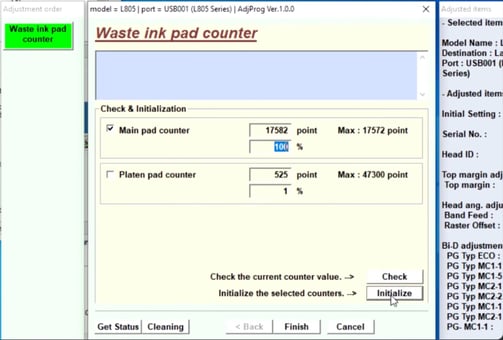
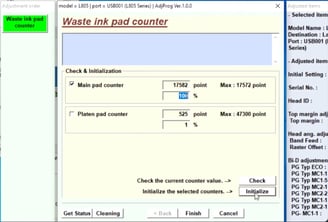
Resetting the Waste Ink Pad Counter
Launch the program and select your printer model and port.
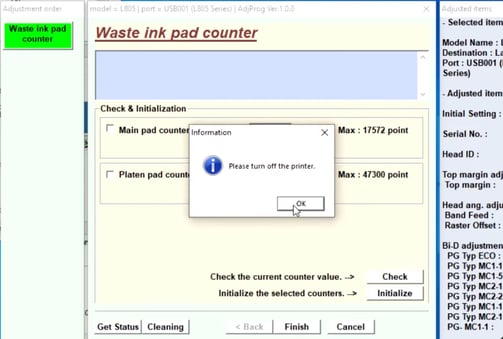
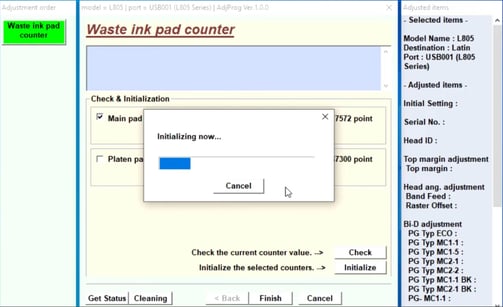
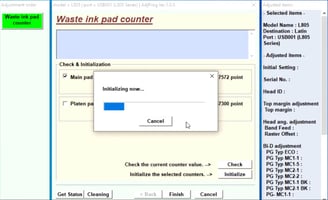
Click on “Waste Ink Pad Counter” from the menu.
Tick the box for “Main Pad Counter” and click “Check” to see the current value.
Click “Initialize” to reset the counter.
Turn off the printer and restart it to finalize the process.
Performing Head Cleaning
Select the “Head Cleaning” option in the maintenance section.
Follow on-screen instructions to clean the print head.
Print a nozzle check page afterward to verify improvements.
Repeat the process if necessary, but avoid overdoing it to conserve ink.
Aligning the Print Head
Open the “Head Alignment” menu.
Select “Auto” or “Manual” alignment, depending on your preference.
For manual alignment, print the alignment pattern and follow the program's instructions to input the correct adjustments.
Resetting the EEPROM
Navigate to the “EEPROM Reset” section.
Click on “Reset” to clear all stored error logs and restore factory settings.
Restart the printer to apply changes.
Updating or Downgrading Firmware
Ensure you have the correct firmware file for your printer model.
In the program, navigate to “Firmware Update” or “Firmware Downgrade.”
Browse and select the firmware file from your computer.
Follow the on-screen instructions to complete the update or downgrade.
5. Common Issues and Troubleshooting Tips
While the Epson Adjustment Program is a powerful tool, users might encounter challenges during its use. This section addresses common issues and provides actionable troubleshooting tips to resolve them effectively.
Problem: The program Not Detecting the Printer
A common frustration is when the Adjustment Program fails to detect the connected Epson printer.
Possible Causes:
Incorrect port selection.
Missing or outdated printer drivers.
Loose USB connection.
Solutions:
Check Connections:
Ensure the USB cable is securely connected to both the printer and computer.
Verify Printer Drivers:
Install or update the correct model drivers from the Epson driver website.
Restart the system once until the printer driver is properly configured.
Correct Port Selection:
Select the correct port from the Select Port options
Use the auto-detect function if unsure of the port.
Problem: Waste Ink Pad Reset Not Working
Sometimes, users report that resetting the waste ink pad counter doesn’t remove the “Service Required” error.
Possible Causes:
Resetting was incomplete.
Printer firmware restrictions.
Actual hardware issues with the ink pads.
Solutions:
Repeat the Reset Process:
Ensure you followed all steps correctly, including restarting the printer after the reset.
Check for Firmware Compatibility:
Some firmware versions block third-party tools from resetting the counter.
Consider downgrading the firmware using the program if supported.
Inspect Ink Pads:
If resetting fails, physically inspect and replace the waste ink pads if they are saturated.
Problem: Head Cleaning Does Not Improve Print Quality
After running the head cleaning function, print quality issues like streaks or faded prints persist.
Possible Causes:
Severely clogged nozzles.
Insufficient ink levels.
Worn-out print head.
Solutions:
Run Multiple Cleaning Cycles:
Perform up to three cleaning cycles, allowing a few minutes between each.
Test with a nozzle check after each cycle.
Check Ink Levels:
Ensure all cartridges have sufficient ink. Replace any low or empty cartridges.
Use Manual Cleaning:
If automated cleaning fails, remove the cartridges and gently clean the print head using a lint-free cloth and distilled water.
Replace the Print Head:
If the problem continues, you might need to replace the print head. Consult a technician for assistance.
Problem: Adjustment Program Shows “Error Code”
The program may occasionally display an error code when attempting to perform certain functions.
Possible Causes:
Incompatible program version.
Communication issues between the printer and the computer.
Software conflicts.
Solutions:
Check Compatibility:
Ensure you are using the correct version of the program for your printer model.
Reinstall the Program:
Uninstall and reinstall the program to resolve potential installation errors.
Restart Devices:
Restart both the computer and the printer. Reconnect the USB cable before relaunching the program.
Disable Conflicting Software:
Close all other applications, especially printer management tools, to prevent conflicts.
Problem: Firmware Downgrade Fails
Downgrading firmware may not work as intended, especially with updated Epson models.
Possible Causes:
Firmware downgrade restrictions.
Incorrect firmware file.
Solutions:
Use the Correct Firmware File:
Ensure the firmware file matches your printer model and version.
Perform a Hard Reset:
Reset the printer to factory settings before attempting the downgrade again.
Seek Alternative Tools:
If the Epson Adjustment Program fails, explore other reputable third-party tools for firmware management.
General Tips for Troubleshooting
Backup Printer Settings: Before making significant changes, back up your printer settings to avoid losing configurations.
Read Error Messages Carefully: Many issues can be resolved by understanding and addressing the specific error codes or messages displayed.
Refer to Official Resources: Consult Epson’s user manuals and support pages for additional guidance.
Exploring the Epson Adjustment Program: All Options Explained
1. Waste Ink Pad Counter Reset
When the waste ink pad in your printer fills up, you’ll see a “Service Required” error. The Waste Ink Pad Counter Reset function allows you to reset this counter, so your printer can continue working even if the pad isn’t replaced immediately. However, it’s crucial to address the waste ink pad issue to avoid further complications.
2. EEPROM Data Initialization
EEPROM stores critical settings and data, but if it becomes corrupted, your printer may start behaving erratically. The EEPROM Data Initialization function resets the data to factory defaults, resolving issues like persistent error messages or malfunctions. This is a more drastic solution and should be used when other methods fail.
3. Head Cleaning
Clogged printheads can lead to faded or streaky prints. The Head Cleaning function forces ink through the nozzles to clear any blockages. It’s an essential step when experiencing poor print quality due to dried ink or debris in the printhead.
4. Nozzle Check
Before cleaning the printhead, run a Nozzle Check to see if the nozzles are clogged. This test prints a pattern to identify missing nozzles, helping you decide whether cleaning or alignment is needed. It’s a crucial step for troubleshooting print quality issues.
5. Printhead Alignment
Misaligned printheads can cause blurry prints or misaligned text. The Printhead Alignment function adjusts the printhead to ensure that ink is applied correctly, resulting in sharp, clear prints. This should be used if your prints appear skewed or uneven.
6. Resetting Ink Levels
If your printer shows inaccurate ink levels after replacing or refilling cartridges, use the Resetting Ink Levels function. This resets the ink counters so that the printer accurately tracks the remaining ink, preventing unnecessary cartridge replacements.
7. USB ID Input
The USB ID Input function ensures that your printer is correctly recognized by your computer. If the printer is not showing up or not communicating properly, this option helps to reset or input the correct USB ID for a smooth connection.
8. Firmware Update
Firmware updates typically bring bug fixes, enhance performance, and introduce new features. By using the Firmware Update option, you can ensure that your printer stays up-to-date with the latest software, which helps prevent issues and improves overall performance.
9. Platen Gap Adjustment
The Platen Gap Adjustment function helps optimize the gap between the printhead and paper, ensuring that the ink is applied evenly. This is particularly useful when using non-standard or thick paper, as it helps avoid smudging and ink bleeding.
10. Check Printer Status
The Check Printer Status option provides detailed information about your printer’s condition, including error codes, maintenance requirements, and operational health. It’s a great tool for diagnosing problems and ensuring your printer is functioning properly.
Insights
Explore the latest in printer technology and tips.
Resources
Support
contact@bestprintershop.com
+918920029543
© 2024 BestPrinterShop . All rights reserved.