Epson Printer Menu: Print Head Cleaning, Nozzle Check & More
Epson printer maintenance tips, print head cleaning, nozzle checks, and page count to ensure optimal performance and high-quality prints.
Praveen Kumar - Canon Printer Specialist
12/28/20248 min read
1. Introduction to Epson Printer Maintenance
Are your Epson printer's prints streaky, misaligned, or losing their original quality? Do frequent paper jams or unexpected printer errors disrupt your workflow? Printer maintenance can often feel overwhelming, leaving many users frustrated and wasting valuable resources. A poorly maintained printer not only produces subpar prints but also hampers productivity, increases costs, and shortens the device's lifespan. Issues like clogged print heads, outdated firmware, and inaccurate color reproduction can quickly derail your personal or professional projects. The good news is that with regular care and attention, you can keep your Epson printer performing like new. This guide will walk you through everything you need to know about Epson printer maintenance—from conducting nozzle checks to optimizing print settings. Whether you're a novice or a seasoned user, these practical tips and actionable steps will help you maintain your printer for peak performance. Let’s get started and ensure your Epson printer stays in top condition!
2. Print Head Nozzle Check
One of the first steps in Epson printer maintenance is performing a nozzle check. This process ensures that your printer’s print heads are functioning correctly and that the ink is flowing smoothly. Clogged nozzles are a common cause of streaky or uneven prints, and addressing them early can save time and prevent further damage.
Why Perform a Nozzle Check?
Over time, ink can dry up and block the tiny nozzles in your Epson printer’s print head. This blockage often results in missing lines, faded prints, or color inconsistencies. A regular nozzle check helps identify these issues before they affect your projects.
Steps to Perform a Nozzle Check
1. Using the Printer Control Panel
Connect the printer to your computer.
Navigate to the printer’s control panel and select the “Maintenance” or “Setup” option.
Look for the “Nozzle Check” option and select it.
Follow the instructions to print the nozzle check pattern if nozzle check is not good start cleaning option.
2. Using Epson Software on Your Computer
Launch the Epson printer utility software on your PC or Mac.
Go to the Maintenance Option tab and click on Print Head Nozzle Check.
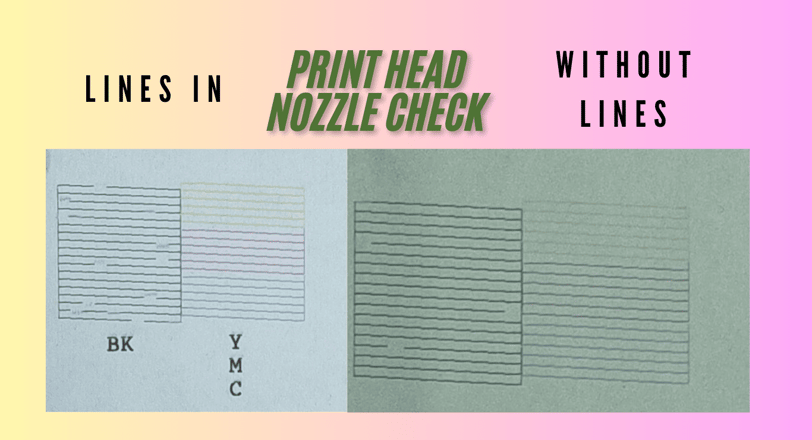
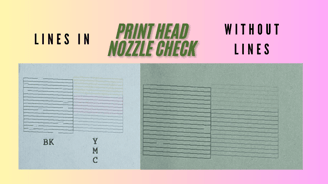
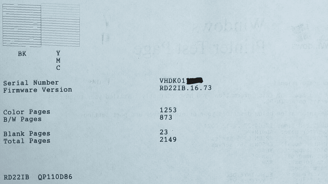
A test pattern will be printed, displaying lines for each color: Black (BK), Yellow (Y), Magenta (M), and Cyan (C).
Interpreting the Nozzle Check Pattern
A complete and clean pattern with no missing lines indicates that the nozzles work correctly.
If you see gaps or broken lines in any color, it shows clogged nozzles.
What to Do If the Nozzle Check Fails?
Proceed with a Print Head Cleaning (covered in the next section).
Avoid repeated nozzle checks and cleanings in quick succession, as these processes consume ink.
3. Printer Information and Settings
Understanding your Epson printer’s essential information and settings is critical for effective maintenance and troubleshooting. Features like the serial number and firmware version can be incredibly helpful when contacting support, ensuring compatibility, or updating your printer to the latest performance standards.
Locating and Understanding the Serial Number
The serial number is a unique identifier for your Epson printer. You may need it for warranty claims, software updates, or when seeking technical assistance.
How to Find It:
On the Printer Body: The serial number is typically printed on a label located on the back or bottom of your printer.
Via Printer Software: Check the Epson printer utility software on your computer. Under the “Printer Information” or “Status Monitor” section, you can often find the serial number displayed.
Checking and Updating Firmware
Firmware is the internal software that controls your printer’s functionality. Keeping it updated ensures your printer performs optimally and remains compatible with your operating system and newer ink cartridges.
Steps to Check Firmware Version:
Open the Epson printer utility on your PC or Mac.
Navigate to the “Maintenance” or “Settings” tab.
Locate the current firmware version listed in the “Printer Information” section.
How to Update Firmware:
Visit the Epson official support website.
Select your printer model and download the firmware update.
Follow the instructions provided during installation.
Why Is Firmware Important?
Guarantees compatibility with the newest operating systems and software.
Fixes bugs or errors in previous versions.
Enhances printer performance and efficiency.

4. Printing Options and Page Configurations
Epson printers offer versatile printing options, allowing you to customize your print jobs for both quality and efficiency. Whether you’re printing vibrant color documents or sharp black-and-white pages, understanding the difference between borderless and with-border configurations can help you optimize your prints.
Borderless Printing
Borderless printing allows you to print edge-to-edge without any white margins, making it ideal for photos, posters, and marketing materials.
1. Printing Color Pages
Borderless color printing delivers vibrant and professional-looking results.
Ensure you’re using photo paper or compatible media for the best quality.
Go to your printer settings, select “Borderless” under layout options, and choose “Color” for the print mode.
2. Printing Black and White (B/W) Pages
While less common, borderless black-and-white prints can create striking monochrome photos or designs.
Select “Borderless” and choose the “Grayscale” or “Black Ink Only” option in the settings.
With Border Printing
This traditional printing option leaves white margins around the edges, commonly used for documents, forms, and regular printing tasks.
1. Printing Color Pages
Use this mode for everyday documents that don’t require edge-to-edge coverage.
Adjust your layout settings to include margins and choose “Color” in print preferences.
2. Printing Black and White (B/W) Pages
Ideal for cost-effective printing, such as text-heavy documents.
Choose “With Border” and select “Black Ink Only” for economical use of ink.
Optimizing Page Configurations
Always match your printer settings to the type of paper you’re using.
For photos, use premium photo paper and select the appropriate quality settings for sharper results.
For documents, opt for draft mode to save ink and print faster, especially for internal use.
5. Page Statistics
Understanding your Epson printer’s page statistics provides valuable insights into your printing habits. Knowing details like the number of color and black-and-white (B/W) pages printed, blank pages, total pages, and even data on the first-time printing can help you manage ink and paper resources more effectively.
Blank Pages
Blank pages are sometimes unintentionally printed due to misconfigured settings, empty files, or software issues.
Tips to Reduce Blank Pages:
Ensure your document doesn’t have extra blank pages at the end.
Check printer settings to avoid selecting options like “Print Blank Pages” accidentally.
Update your printer driver to ensure compatibility with your operating system.
Total Pages Printed
Your printer tracks the total number of pages it has ever printed.
How to Check Total Pages:
Access the Epson Status Monitor or Maintenance menu.
Navigate to “Printer Information” to view the total print count.
Tracking this number can help you estimate when maintenance tasks like replacing ink cartridges or servicing print heads might be needed.
Color Pages vs. B/W Pages
Monitoring the ratio of color to black-and-white pages helps you:
Identify how much ink you’re using for different types of jobs.
Budget for replacing color cartridges more frequently if your work is graphic-heavy.
Tips for Managing Ink Usage:
For non-critical color documents, use “Draft Mode” to conserve ink.
For black-and-white text, set the printer to “Black Ink Only” in the print settings.
First-Time Printing Data
This metric refers to the time it takes for your printer to produce its first page after being idle. A longer first-time printing duration could indicate:
The need for print head cleaning.
Older firmware or a need for a reset.
How to Improve First-Time Printing:
Keep the printer on standby during high-use periods.
Perform regular maintenance, such as cleaning the print heads and ensuring firmware is up to date.


6. Print Head Maintenance
The print head is the heart of your Epson printer, responsible for transferring ink onto the paper. Over time, it may become clogged or misaligned, affecting print quality. Regular maintenance such as cleaning and alignment can ensure consistent performance and extend the lifespan of your printer.
Print Head Cleaning
When you notice streaks, gaps, or faded colors in your prints, a print head cleaning is often the first solution.
Steps to Clean the Print Head:
Access the Maintenance section through your printer control panel or Epson software.
Select “Print Head Cleaning.”
Follow the on-screen instructions to begin the process.
After cleaning, perform a Nozzle Check to verify the results.
Important Tips:
Avoid excessive cleanings in a short period, as this consumes ink.
Use this function only when necessary to conserve resources.
Power Cleaning
If regular cleaning doesn’t resolve print quality issues, a Power Cleaning may be required. This deep cleaning process is more thorough but uses more ink.
How to Perform Power Cleaning:
Access the advanced maintenance settings through the printer utility software.
Select “Power Cleaning” and follow the prompts.
Allow the printer to rest for a few hours afterward to stabilize the ink flow.
Print Head Alignment
Shifted print heads can result in blurry or mismatch print alignment. Regular alignment ensures that ink placement is precise, improving print clarity.
Steps to Align the Print Head:
Open the Epson printer utility and navigate to “Print Head Alignment.”
Follow the prompts to print an alignment test page.
Select the best alignment pattern from the test page to complete the process.
When to Align the Print Head:
After moving the printer to a new location.
If lines or text appear misaligned or out of place.
Preventing Print Head Issues
Use your printer regularly one black print and one color print to prevent ink from drying out and clogging the nozzles.
For optimal performance, always use genuine Epson ink cartridges.
Store the printer in a dust-free environment to avoid external contaminants.
7. Epson Software Tools
Epson provides several software tools that enhance the user experience and simplify printer maintenance. These tools allow you to monitor printer performance, manage print jobs, and customize settings to suit your needs. Let’s explore some of the most valuable options.
Job Arranger Lite
Job Arranger Lite is a tool designed to help you manage and customize print jobs more effectively.
Features:
Combine multiple documents into a single print job.
Reorganize pages or split them into separate jobs.
Add annotations, watermarks, or custom layouts.
How to Use:
Open the Epson Job Arranger Lite software.
Import your documents and arrange them as needed.
Customize the print settings for each document or for the entire job.
Send the completed job to the printer.
This tool is especially helpful for professionals managing complex printing tasks, such as reports or presentations.
Epson Status Monitor 3
The Epson Status Monitor 3 is your go-to utility for real-time printer monitoring.
What It Does:
Displays ink levels and warns you when cartridges are low or empty.
Provides updates on printer status (e.g., errors, paper jams).
Helps you troubleshoot common issues directly from your computer.
How to Access:
Open the printer properties on your PC or Mac.
Navigate to the “Maintenance” tab and select “Epson Status Monitor 3.”
This tool ensures you’re always informed about your printer’s condition, helping to avoid unexpected disruptions.
Monitoring Preferences
Customize how and when your Epson printer alerts you to its status.
Key Options:
Notifications: Enable or disable pop-up alerts for issues like low ink or paper jams.
Usage Reports: Access detailed logs of past print jobs to analyze usage patterns.
Silent Mode: Reduce noise by limiting notifications during specific hours.
Extended Settings
Epson’s extended settings allow for deeper customization of printer functions.
Notable Features:
Adjust paper size and type defaults to match your most-used settings.
Enable Eco Mode to save ink and energy.
Set default preferences for color or black-and-white printing.
How to Access:
Open the printer’s utility software and navigate to “Extended Settings.”
Print Queue Management
The print queue is where all active and pending print jobs are listed. Managing the queue effectively ensures smooth operation.
How to Manage Your Queue:
Access the print queue via your computer’s Devices and Printers settings.
View, pause, or cancel individual print jobs.
Reorder jobs based on priority.
Printer and Option Information
This section of the Epson software provides detailed technical specifications about your printer and connected peripherals.
Key Details Included:
Firmware version and update status.
Network settings (for wireless printers).
Installed accessories, such as additional paper trays.
Insights
Explore the latest in printer technology and tips.
Resources
Support
contact@bestprintershop.com
+918920029543
© 2024 BestPrinterShop . All rights reserved.